
Winter fly fishing – are you ready?
By TOM WELCH, Registered Maine Guide & Owner of Magalloway Guide Service.
A year ago, I wrote about the prospect of fishing throughout the winter. See “Retirement, winter nymphing — and a whole lot of gumption,” posted Nov. 25, 2015. Until 2015, I had not done a lot of winter fishing — not because of a lack of available waters, but because I lacked the ‘gumption’ to put on all that gear and step into freezing cold water. As it turned out, I did a fair amount of it last winter, as the relatively mild weather conditions made it (somewhat) tolerable. I had a good measure of success, too, in several southern Maine spots that are open to year-round fishing.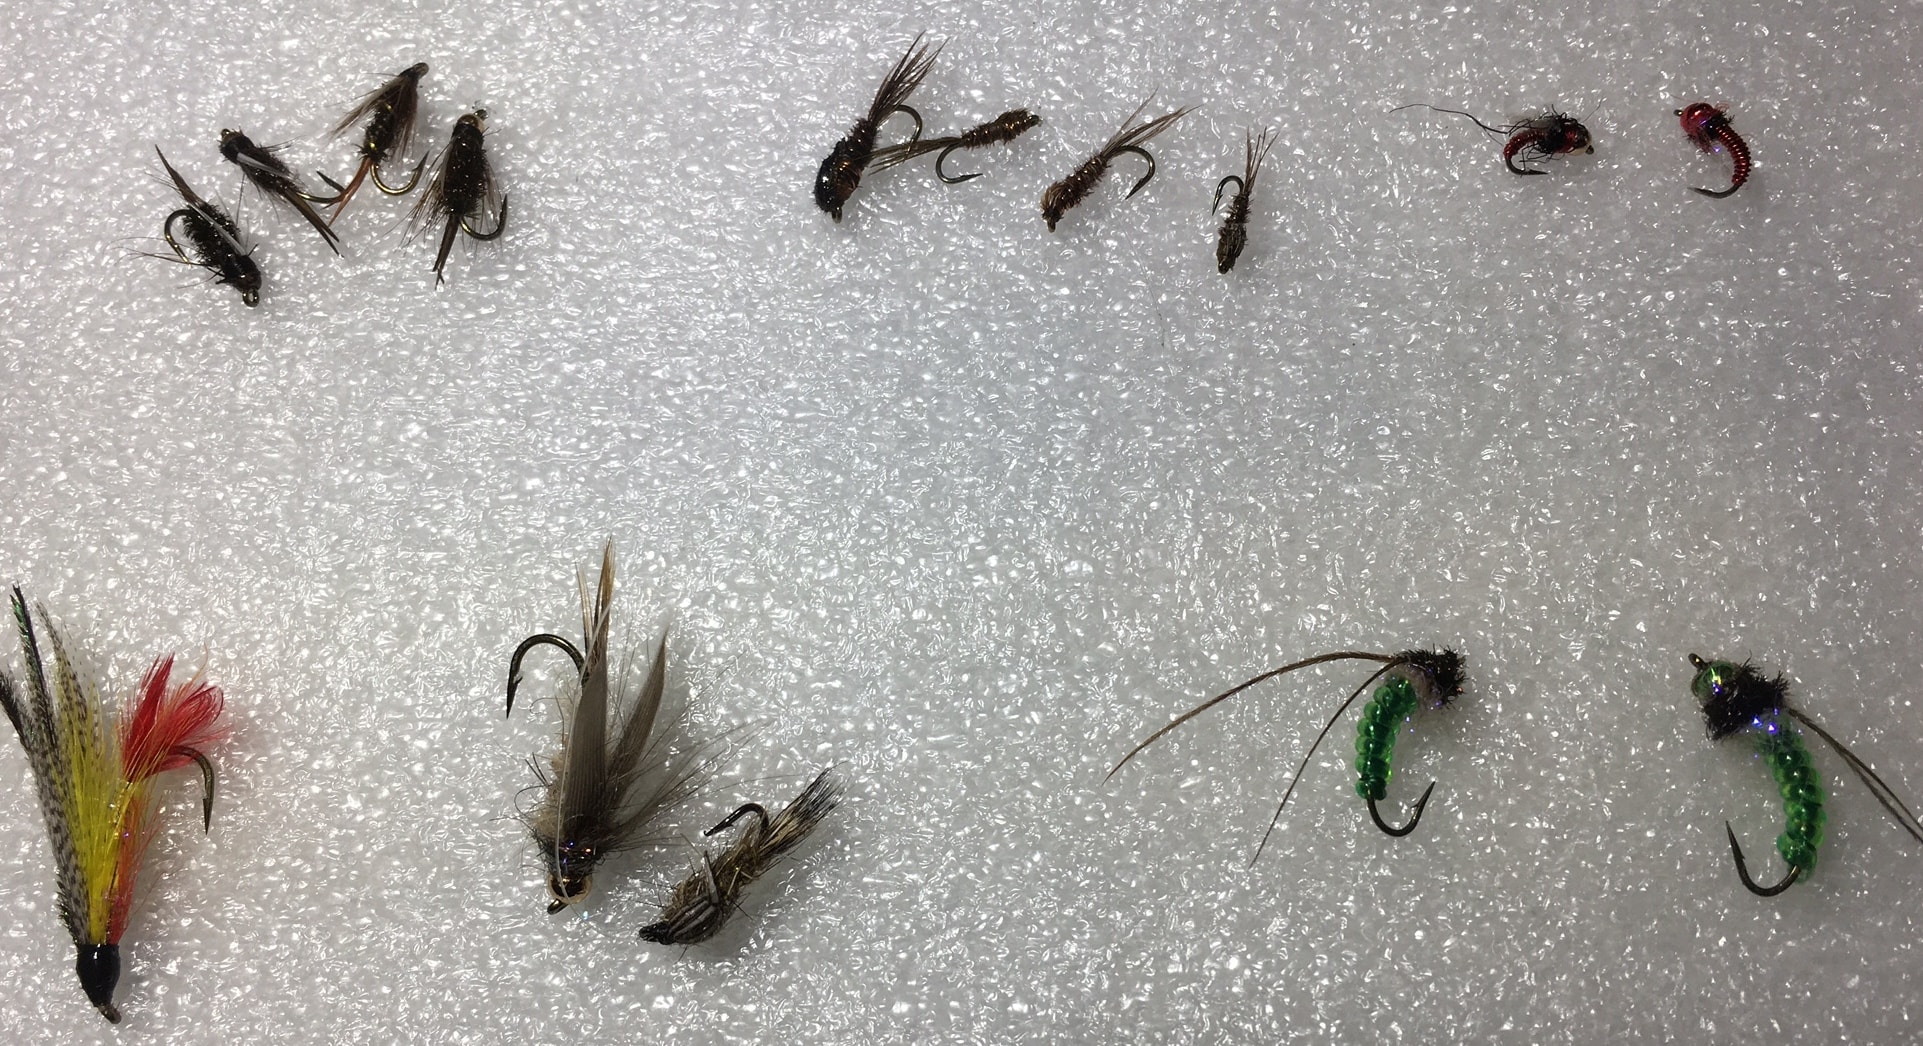
The regular season’s pretty much over in Northwestern Maine, and I’m already getting itchy to get back in the water. Southern Maine (York and Cumberland Counties, in particular) has several year-round streams, most of them well-stocked during spring and fall.
Right now, I’m scouting some of my favorite spots and tying flies to beat the band, in preparation for another winter season. But before that happens, I need to re-work some of my gear and heed some of the lessons learned last winter. My goal is to better prepare myself for the often numbingly cold conditions, and assemble some of the flies that were most productive. First, a few of the lessons learned, and some tips:
Lesson 1: Keep our legs and feet as warm as possible. Frozen feet and legs are not only uncomfortable, they’re a hazard. If you think you can clamber over slippery rocks and keep your balance in even a moderate current after 30 minutes in water that is hovering around freezing, you’re delusional. If you are an older adult, like me, you are an accident waiting to happen — and a potentially serious one. Taking a dip in that kind of water, on a sub-freezing day, will subject you to hypothermia in minutes, and if you in any kind of current at all, you could be easily washed downstream like a frozen rag doll.
Tip: Unless you own neoprene waders — and frankly, even if you do — wear as much insulating material as you can under your waders without restricting your movement too much (see the rag-doll analogy above). This seems obvious, but it requires some careful thought and planning. I recommend wool long johns (if you can stand them), over a base layer of polypropylene or some other tech material, and a pair extra neoprene booties to start. If you can add a third, loose layer of pants, it would be worth your while to consider, as long as you can move freely. For the extra booties, you don’t need to buy something expensive; if you’ve got an old pair of waders that are no longer useable, cut the booties off of them and put them over your existing wader booties (in case the old ones leak). Be prepared to adjust your boot laces (or wear larger wading boots) so that they will fit comfortably. You don’t want to restrict your blood circulation in freezing cold temperatures. Finally, wear a pair of thin, polypropylene socks as a base layer for your feet, then place a foot warmer between them and your insulating socks. The kind that cover the entire bottom of your foot work best. They’re wafer thin, they’re cheap, and they work pretty well. Your feet will thank you. Also, so-called ‘mega warmers,’ which are larger versions of the standard hand warmers, can be placed between your insulating leg layers to keep your upper legs warm. They are almost always constructed with adhesive material on one side, so they will stay in place.
Lesson 2: Minimize what you carry. People who know me will chuckle to hear me say this, but I learned to scale back (somewhat) last winter. You really don’t need to carry a lot of accessories with you into the water in December, January and even early February. You will need the basics: your wading staff (mandatory for me), a net, a set of nippers, pliers or forceps, tippet material, non-lead weighting material and the flies you’ll need easily reachable in the pockets of your outer wear. And you probably will need only one fly box, specifically prepared for your particular excursion (more on that in a bit).
Tip: A fly-fishing lanyard (sold in most fly shops) will carry everything but the flies, and will be light and unobtrusive enough so that you can move. For the flies, I use a fly box with a strap that goes around my neck, and in it I carry all the flies and weights I think I’ll need for the conditions of a given day. All of this should be planned well in advance of getting into the water, and done in a place that is warm, so that your rig knots are secure, and your leader/tippet material is sufficient to get you through your time in the water. The rest of your stuff should be in a bag on the shore (or in the vehicle, if it is accessible during breaks, which is the next topic)
Lesson 3: Take frequent breaks. Freezing water has a way of disabling even the youngest and strongest bodies. As you get older, these conditions can paralyze an otherwise healthy adult. So, in water that is hovering around freezing, move your legs carefully every few minutes while in the water. And as soon as you feel some difficulty in lifting your feet or moving your legs, get out of the water and head for the vehicle to warm up. Don’t worry about losing your spot; there aren’t many winter days when crowds are a problem. If it’s a rare sunny, warm day, you may have others around (Keep in mind that the water may still be bitterly cold). But your neighbors will have to get out of the water too at some point. There’s no real rule-of-thumb as to how long to tolerate the freezing water; your body will tell you. But even the slightest misstep or slip is a warning signal to get out. Suffice it to say that your body will not tolerate standing in that kind of cold for very long. For me, my alarm goes off after 15-20 minutes.
Tip: If your vehicle is only a short distance away, plan to use it for your break. When you move to your vehicle to warm up, bring your fly rod with you into the vehicle, if you can. If you have a truck, carefully break the rod down so that it will fit in the driver/passenger compartment. Eat a snack and drink some water. If you have an SUV or a large sedan, your rods will likely fit inside. It doesn’t have to be pretty and it isn’t for travel. Wipe the road and reel off with a dry cloth, as the line and eyelet guides will likely have frozen. If your vehicle is not easily accessible, warm up by walking around, moving all of your limbs, moderate stretching, in a sunny spot if that’s possible. Wipe your rod and reel with a dry cloth as best you can. Return to the water only if you feel that your limbs have recovered and you can move easily. If not, don’t be stubborn; call it a day.
Winter Flies: Small nymphs and wet flies work best for me in most very cold conditions and in most spots. Fly fishing isn’t a precise science, so every situation will dictate what you use and how you use it. Once winter sets in, there are a limited number of insects and other creatures that are active. Wet flies represent a myriad of things, from swimming insects to small baitfish. It makes sense to use patterns that cross over those categories. Here’s what I use when the cold settles in, and the reasons why:
- Very small nymph patterns, like size 20 prince nymphs and 18-22 pheasant tails (or even smaller), sparsely tied. These imitate a number of small mayflies — in particular, tiny blue winged olives (BWOs), which are active all year long. In the winter, the naturals will move about and swim, so the Sawyer pheasant tail is a very good pattern to represent a swimming BWO. I recommend rigs with two flies. Whatever your preferred technique — whether it’s indicator nymphing, French, Czech-style, or any hybrid — use it. Don’t overlook larger nymphs, like Isonychia (Zug Bugs), which also can be active in the colder weather.
- Caddis larvae. Caddis larvae are prevalent throughout the season,and can be seen floating in the water column in a variety of colors and shades. I prefer caddis green larvae, size 18 to 14, which seem to cut across the categorical boundaries. A good rig for me has been a weighted caddis larva for an anchor and a small Sawyer pheasant tail. I’ll drift that on or near the bottom for a bit, and then short-strip it with my fingers to bring the swimming nymph into focus. Hint: when you take a break, check for tiny, thin green slimy things clinging to the surface of your waders. A close look will likely reveal caddis larvae that have sent adrift in the current for one reason or another.
- Midge larvae. Midges are active year-round, and should be considered a part of every winter fly box and rig. More than half the time I will tie a simple zebra or red-wire midge pattern a few inches away from a prince or pheasant tail, especially if I’m searching. The midge patterns should be small: I have found success with size 18-22 in a variety of colors. Red, however, cuts across the categorical boundaries.
- Small gold-rib, hare’s ear nymphs and hare’s ear wet flies. The hare’s ear fly pattern is a time-tested standard that will mimic many aquatic creatures. It is a must in your winter fly box. Be sure to carry the nymph pattern, along with a slightly larger hare’s ear wet pattern (weighted), which could be a deadly combo under certain conditions.
So if you have the itch, as I do, don’t overlook the icy cold rivers and streams. Be sure your stream is open to fishing, and get ready. Above all else, stay warm.